Virtual Server via NAT
This page contains information about the working principle of virtual server via NAT, and configuration examples of VS/NAT system.
Network address translation
Due to the shortage of IP address in IPv4 and some security reasons, more and more networks use internal IP addresses (such as 10.0.0.0/255.0.0.0, 172.16.0.0/255.240.0.0 and 192.168.0.0/255.255.0.0) which cannot be used in the Internet. The need for network address translation arises when hosts in internal networks want to access the Internet and be accessed in the Internet.
Network address translation is a feature by which IP addresses are mapped from one group to another. When the address mapping is N-to-N, it is called static network address translation; when the mapping is M-to-N (M>N), it is called dynamic network address translation. Network address port translation is an extension to basic NAT, in that many network addresses and their TCP/UDP ports are translated to a single network address and its TCP/UDP ports. This is N-to-1 mapping, in which way Linux IP Masquerading was implemented. More description about network address translation is in rfc1631 and draft-rfced-info-srisuresh-05.txt.
Virtual server via NAT on Linux is done by network address port translation. The code is implemented on Linux IP Masquerading codes, and some of Steven Clarke's port forwarding codes are reused.
How does a virtual server via NAT work?
First consider the following figure,
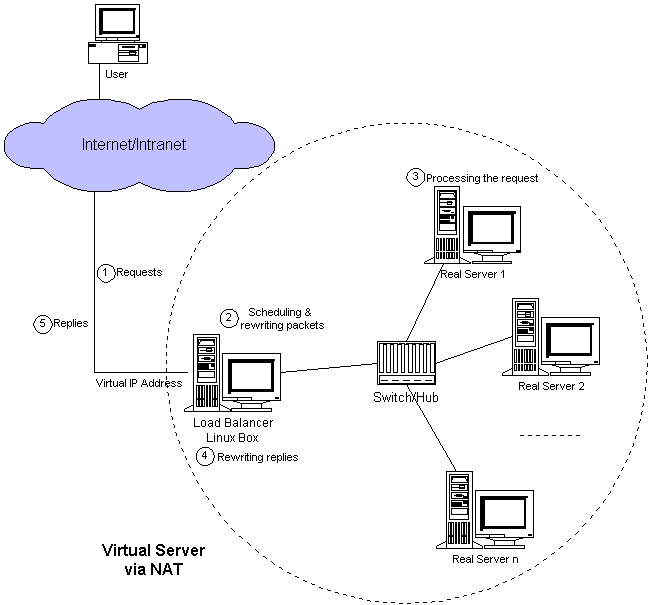
When a user accesses the service provided by the server cluster, the request packet destined for virtual IP address (the external IP address for the load balancer) arrives at the load balancer. The load balancer examines the packet's destination address and port number. If they are matched for a virtual server service according to the virtual server rule table, a real server is chosen from the cluster by a scheduling algorithm, and the connection is added into the hash table which record the established connection. Then, the destination address and the port of the packet are rewritten to those of the chosen server, and the packet is forwarded to the server. When the incoming packet belongs to this connection and the chosen server can be found in the hash table, the packet will be rewritten and forwarded to the chosen server. When the reply packets come back, the load balancer rewrites the source address and port of the packets to those of the virtual service. After the connection terminates or timeouts, the connection record will be removed in the hash table.
Confused? Let me give an example to make it clear. In the example, computers are configured as follows:
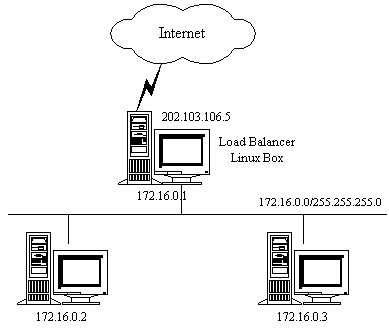
Note real servers can run any OS that supports TCP/IP, the default route of real servers must be the virtual server (172.16.0.1 in this example). The ipfwadm utility is used to make the virtual server accept packets from real servers. In the example above, the command is as follows:
    echo 1 > /proc/sys/net/ipv4/ip_forward
    ipfwadm -F -a m -S 172.16.0.0/24 -D 0.0.0.0/0
The following figure illustrates the rules specified in the Linux box with virtual server support.
| Protocol | Virtual IP Address | Port | Real IP Address | Port | Weight |
| TCP | 202.103.106.5 | 80 | 172.16.0.2 | 80 | 1 |
| 172.16.0.3 | 8000 | 2 | |||
| TCP | 202.103.106.5 | 21 | 172.16.0.3 | 21 | 1 |
All traffic destined for IP address 202.103.106.5 Port 80 is load-balanced over real IP address 172.16.0.2 Port 80 and 172.16.0.3 Port 8000. Traffic destined for IP address 202.103.106.5 Port 21 is port-forwarded to real IP address 172.16.0.3 Port 21.
Packet rewriting works as follows.
The incoming packet for web service would has source and destination addresses as:
| SOURCE | 202.100.1.2:3456 | DEST | 202.103.106.5:80 |
The load balancer will choose a real server, e.g. 172.16.0.3:8000. The packet would be rewritten and forwarded to the server as:
| SOURCE | 202.100.1.2:3456 | DEST | 172.16.0.3:8000 |
Replies get back to the load balancer as:
| SOURCE | 172.16.0.3:8000 | DEST | 202.100.1.2:3456 |
The packets would be written back to the virtual server address and returned to the client as:
| SOURCE | 202.103.106.5:80 | DEST | 202.100.1.2:3456 |
How to build the kernel
First, get a fresh copy of the Linux kernel source of the right version. Second, apply the virtual server patch to the kernel. Third, make sure the following kernel compile options at least are selected.
1. The VS patch for kernel 2.0.36 or later
Kernel Compile Options:
Code maturity level options --->
    [*] Prompt for development and/or incomplete code/drivers
Networking options --->
    [*] Network firewalls
    ....
    [*] IP: forwarding/gatewaying
    ....
    [*] IP: firewalling
    ....
    [*] IP: masquerading
    ....
    [*] IP: ipportfw masq & virtual server support
And, you have to choice one scheduling algorithm.
    Virtual server scheduling algorithm
    (X) WeightedRoundRobin
    ( ) LeastConnection
    ( ) WeightedLeastConnection
Finally, rebuild the kernel. Once you have your kernel properly built, update your system kernel and reboot.
At last, build ippfvsadm utility from ippfvsadm.c program. And, the virtual server rules can be specified by ippfvsadm. For example, for the rules in the table above, we can use the following commands.
    ippfvsadm -A -t 202.103.106.5:80 -R 172.16.0.2:80 -w 1
    ippfvsadm -A -t 202.103.106.5:80 -R 172.16.0.3:8000 -w 2
    ippfvsadm -A -t 202.103.106.5:21 -R 172.16.0.3:21
2. The IPVS patch for kernel 2.2.x
Kernel Compile Options:
Code maturity level options --->
    [*] Prompt for development and/or incomplete code/drivers

Networking options --->
    [*] Network firewalls
    ...
    [*] IP: forwarding/gatewaying
    ...
    [*] IP: firewalling
    ...
    [*] IP: masquerading
    ...
    [*] IP: masquerading virtual server support (EXPERIMENTAL)
    (12) IP masquerading table size (the Nth power of 2)
    <M> IPVS: round-robin scheduling
    <M> IPVS: weighted round-robin scheduling
    <M> IPVS: least-connection scheduling
    <M> IPVS: weighted least-connection scheduling
    <M> IPVS: locality-based least-connection scheduling
    <M> IPVS: locality-based least-connection with replication scheduling
Once you have your kernel properly built, update your system kernel and reboot. At last, change to the ipvsadm source and type "make install" to install ipvsadm into your system directory.
To make the load balancer forward the masquerading packets
    echo 1 > /proc/sys/net/ipv4/ip_forward
    ipchains -A forward -j MASQ -s 172.16.0.0/24 -d 0.0.0.0/0
Add virtual service and link a scheduler to it
    ipvsadm -A -t 202.103.106.5:80 -s wlc  (Weighted Least-Connection scheduling)
    ipvsadm -A -t 202.103.106.5:21 -s wrr  (Weighted Round Robing scheduling )
Add real server and select forwarding method
    ipvsadm -a -t 202.103.106.5:80 -r 172.16.0.2:80 -m
    ipvsadm -a -t 202.103.106.5:80 -r 172.16.0.3:8000 -m -w 2
    ipvsadm -a -t 202.103.106.5:21 -r 172.16.0.2:21 -m
3. The IPVS patch for kernel 2.4.x
Kernel Compile Options:
Code maturity level options --->
    [*] Prompt for development and/or incomplete code/drivers

Networking options --->
    [*] Network packet filtering (replaces ipchains)
    [ ]   Network packet filtering debugging
    ...
      IP: Netfilter Configuration  --->
      IP: Virtual Server Configuration  --->
	<M> virtual server support (EXPERIMENTAL)
	[*]   IP virtual server debugging
	(12)   IPVS connection table size (the Nth power of 2)
	--- IPVS scheduler
	<M>   round-robin scheduling
	<M>   weighted round-robin scheduling
	<M>   least-connection scheduling scheduling
	<M>   weighted least-connection scheduling
	<M>   locality-based least-connection scheduling
	<M>   locality-based least-connection with replication scheduling
	<M>   destination hashing scheduling
	<M>   source hashing scheduling
	--- IPVS application helper
	<M>   FTP protocol helper
The commands are similar to that of IPVS in kernel 2.2.*.